Note, this article was first published on www.bc4x4.com, which was owned and managed by some good friends, around 1999. After about 10 years, the article is now a bit out of date and was taken down. But I’ve put it here for posterity, since I’m still proud of this project.
Introduction
By Robert W. Bryce
Today, with the tough rocky trails, going slow is the name of the game. The problem is that there is usually a compromise involved:
- you gear your truck slow enough to stay happy on the trails and suffer the consequences on the pavement; or
- you keep good highway gears but are always wishing to be able to crawl slower off-road.
This was the dilemma I was facing. With 4.10 gears, the street 33″ tires are ideal for the highway. But with 35″, and now 36″ off-road tires, my trail gearing left a lot to be desired. I wanted to avoid re-gearing the differentials; the cost is pretty steep and my highway gearing (which I use a lot) was perfect. The truck is my daily ride. In fact, it is my only ride! I was faced with four alternatives to re-gearing the differentials:
- Install a different transmission/transfer case combination. I looked closely at this option. An NV4500 transmission would be nice, but they are hard to find and expensive to purchase. An NV4500 would also require an almost total rebuild of the floorboards due entirely to its size. Going to a 4-speed transmission with an ultra-slow first gear was also an option, but that would have meant losing overdrive, and I do too many highway miles. Plus, all of my options for cheap 4-speed transmissions would leave me with a front driveshaft that was too short for my lift. Having the transmission shifter come up into my dash wasn’t particularly appealing, either.
I could have chosen to switch to an automatic transmission, too. Larry Soo’s automatic seems to work well for him off-road in the majority of conditions. But sourcing all the parts needed to switch my truck from a manual to an automatic transmission seemed like an expensive undertaking that would still leave me with rather high gearing (despite the torque converter). - Purchase a lower low-range gear-set for my NP231 transfer case. I didn’t like this option because I was getting into non-standard “hard parts”, where if I broke something, I would have to return to the original company. What if the company no longer exists when the need arises? What if they do still exist, but replacement parts are prohibitively expensive? Also, I’m not always going super-slow, and sometimes the lower low range might be too slow. This option was finally discarded for one simple reason: I considered the low-range gear-set too expensive for my wallet.
- Buy the dual T-case “box” that is available. I liked this option because it gives me another range for gear selection and the option of 2wd low range. But again, it involved “hard parts” that could be difficult or expensive to source to replace. And its price is about the same as the lower low-range gear-set for the NP231.
- Build my own dual transfer case “box”. Sure, I would be getting involved in non-standard parts, but at least I knew what those parts were, so I could reproduce them and/or make them better when the need arose. Plus, it gave me a chance to learn about another aspect of my truck and likely (hopefully) save some money. This appealed to me, so this option was chosen.Editor’s note: Rob forgot to mention that he is, by nature, a cheap bastard. It was obvious to me that he would take the do-it-yourself route.
This article describes the design, build-up, mistakes, and observations of home-brew dual T-case project. It is not a project for the timid, but it can certainly be duplicated.
Parts Used
A cheap ’88 NP241 from a GM pickup was located and used for the project. The front half of the case was cracked, but all the parts inside were in great condition. From this case, I used the front half (modified), the planetary gear set, the shift fork and shifter rail, and the output shaft (for the rear T-case). I also used a broken NP231 output shaft (thanks, Larry), but I could have used any other output shaft.
This project would have worked equally well using parts from either a spare NP231 or NP242. The primary reason for locating the NP241 was for stronger parts for the rear transfer case, though some Dodge NP231 transfer cases are also good candidates. On some Dodge NP231 transfer cases, the output shaft is equal in diameter (and strength) to the NP241. The larger shaft is said to be some 60% stronger than the Jeep shaft. The actual strength increase isn’t critical; the larger output shafts come behind big blocks and diesels from factory, that’s good enough for me. Also, the Dodge NP231 uses a 1.25″ wide chain. This is the same as the NP241, and will be stronger than the Jeep chain which is 1″ wide. The NP241 low range planetaries are also considerably stronger than any NP231. The NP231 (and NP242) cage uses 3 gears, the NP241 cage uses 6 and is a direct swap into the NP231 transfer case. This gain in strength was important to me, to handle the multiplication in torque.
When intermixing these transfer case parts, be careful on the years of the T-cases, there have been changes over the years. In particular, the gear pitch on the low range planetaries changed at least once during the early 90’s to reduce gear whine.
Design
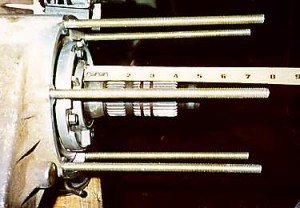
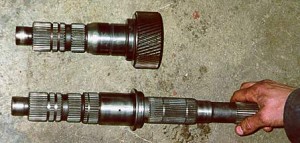 The original output shaft is pictured below. The new mid-shaft is above, and is part of an output shaft welded to a spare input gear. |
The first step in this design was to build a mid-shaft. The purpose of this shaft is to transfer torque from the front gear reduction box into the rear transfer case. The broken NP231 output shaft and a spare short input gear were used for this. The broken shaft was shortened, then turned down on a lathe to fit tightly inside the spare input gear to correctly align the two pieces together. The two pieces were then TIG welded together by a local shop that has had great success welding axle shafts. The alternative here was to have the broken NP231 shortened, then re-splined for the input gear. This option wasn’t chosen because the re-splined section would have to be re-hardened, which would increase the cost of the project.
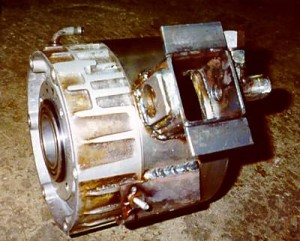
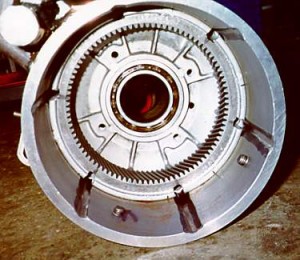 This is the remains of the front half of the NP241. The cylinder surrounding it was fabricated from steel. |
The front half of the case from the NP241 was used to hold the planetary gear set for the gear reduction box. It was trimmed back to where the snap ring retaining the planetary ring gear is located. Next, the material that held the original shifting mechanism was removed. What is left is essentially a cylinder with a cap in one end (which holds the input gear bearing).
Mating the transmission, the gear reduction box, and the rear transfer case was difficult to solve. There are studs that mate the transfer case to the transmission. These studs and the planetary ring gear were removed from the NP241 “cylinder”. Then, the stud holes were drilled right through the case. Long studs were made from grade 8 threaded rod, and put into the rear T-case. These studs run through the gear reduction box and mate the transfer cases to the transmission in much the same way as the original studs did. The gear reduction box “floats” on these long studs.
The NP241 “cylinder” isn’t at all long enough to mate to the rear T-case, so a chunk of round steel tubing was located. It and the NP241 “cylinder” were lathed so that the aluminum NP241 cylinder would press fit into the steel tubing by about an inch. The steel tubing makes up the remainder of the gear reduction box housing. The length of the mid-shaft that was made at the start of this project determined the length of this housing. This required some pre-assembly before the steel tubing was pressed onto the aluminum. The inside of the steel tubing had to be notched for the long studs from the rear T-case.
If I were to repeat this project, I would completely enclose the aluminum with the steel ring, or even just discard all of the original aluminum housing. My solution introduced a difficult sealing problem between the aluminum and steel. In the end, it took a careful and liberal application of good quality silicon to solve the sealing problem. I could have also used a large O-ring between the aluminum and steel.
Once the aluminum/steel gear reduction box housing was assembled, the planetary ring gear was re-installed. The ring gear had to be slightly notched to clear the studs that pass from the rear transfer case to the transmission.
There is a 1/4-inch plate of flat steel between this gear reduction housing and the rear T-case. It is there for two reasons:
- to provide a better seal surface between the cases; and
- to provide a support for the rear T-case, so that the long studs do not bear all of the weight and torque applied to the rear T-case.
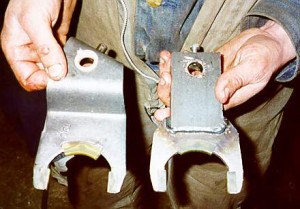
The next steps involve the shifting mechanism. We took the steel shift fork from the NP241 and “flattened” it. I.e., it has many bends making it too long for the housing, so we cut the bends out. Next, the location through the steel housing for the shift fork was determined, and a hole was cut into the housing. The hole fits nicely between two of the long studs, so there were no concerns with respect to this for final assembly.
The shifter fork is pinned to the shifter rail with a 1/4-inch bolt. We also cut some detents in the rail to lock the gear reduction box in the appropriate range. Care had to be taken to ensure that the shifter rail was parallel to the mid-shaft so that nothing would bind. The shifter rail is from the NP241 too, but it is luckily the same diameter shaft as the shifter rails in Dana 300 and Dana 20 transfer cases. We used a Dana 300 shifter rail seal for the seal on this box. Some of the NP241 detent mechanism was used; it took some tries to get the spring pre-load “just right” to make the shifting feel right.
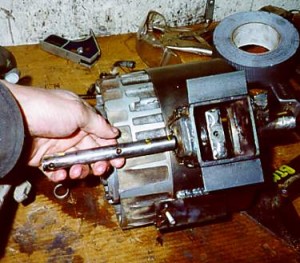
The housing for the shifting mechanism is only a combination of some square tubing, miscellaneous nuts and flat stock. Admittedly, it came out looking pretty ugly, but it works, and it’s out of sight when the gear reduction box is on the truck. More time should have been spent here, as a few small leaks have cropped up here. These leaks have been relatively easy to solve, so I won’t spend the time and energy to re-do this part of the project.
The lever was fabricated from a spare shifter lever, and from some more flat stock. The shifter rail is notched, then bolted to the lever. The lever pivots on a bracket welded to the steel housing. It was actually easier to design a lever for the shifting mechanism, than it was to use a cable actuated system.
A drain hole and fill hole were tapped into the steel housing. The original vent line in the NP241 aluminum piece was kept. Right now, I am using the same oil in the gear reduction box, as what the NP231 T-case uses: ATF. The gear reduction box is sealed from the rear T-case.
 The finished transfer case assembly. |
 The complete drivetrain package. It’s long but the extra transfer case reduction unit only adds around 6″ to the total length. |
Other Costs and Details
As mentioned, the NP241 has the 6-gear planetary (NP231 is a 3-gear planetary) and a larger output shaft. The 6-gear planetary is a direct swap into the NP231 rear T-case for strength. The larger output shaft is very desirable (who hasn’t heard of someone breaking an NP231 rear output shaft?! The extra gear reduction would mean even more torque on this weak shaft!) However, other parts had to be purchased to use the larger output shaft. A new output shaft bearing retainer (where the speedometer gear goes into the transfer case), and a new speedometer gear (that slips onto the larger output shaft) were purchased. Dodge part #’s are #04746266 and #04338996, respectively. I re-used the speedometer cable drive gear. I re-used the stock GM slip yoke design (which is the same as the Dodge slip yoke design). If you’ve gotten this far, then building a fixed yoke kit should be trivial.
Rather than modifying the NP231 transfer case with stronger internal parts, I could have fixed the NP241 cracked housing and installed it complete. I didn’t choose this primarily because the NP241 is physically larger, making it much more difficult to fit. Adding length to the drivetrain introduces other costs. The shifter linkage for the rear transfer case had to be extended. (At the same time, I switched from the stock Jeep XJ T-case shifting mechanism to the superior Jeep YJ mechanism for the rear case.) New driveshafts also had to be built. For this application, a new crossmember also had to be designed and built. This has meant new skid plates, too.
We also had to change the shape of the underside of the cab somewhat. It was not shaped in a way intended for a dual T-case! This modification even meant cutting off one of the mounts for the bench seat. If I had bucket seats, then I would have had to relocate a seat mount rather than simply removing it.
At least the speedometer cable was (just) long enough that it didn’t have to be replaced!
Some of the floor also had to be cut and reshaped to make room for the extra shifter through the floor. If a cable actuating system had been used for the gear reduction box, some of this would not have been required. I made a new cover for the floor to go around the shifters out of checker-plate aluminum. What remains is to source proper shifter boots for the transfer case levers.
Observations and Conclusions
The overall length of the gear reduction box turned out to be exactly 6.375 inches in length. This is not a concern for me; as a long-box Jeep Comanche has a wheelbase of 119″. However, looking at the design, I expect that the mid-shaft and the gear reduction box could be shortened by up to a half-inch without requiring modifications to the rear T-case. With some ingenuity, I suspect that the design could be shortened further, making it applicable for some short wheel-base Jeeps.
I have now put enough high-torque off-road miles on this gear reduction box for me to consider it “proven”. Still, a primary concern continues to be the welded shaft, since all of the torque is transferred through it. When I have some spare cash, I plan on having a spare shaft built.
Off-road, this gear reduction box is a dream! With the AX-15 transmission (3.83:1 1st gear), two NP231/NP241 planetaries (2.72:1), and 4.09 gears, that gives me a final reduction of 116:1! It is nice and slow, far better than the 42:1 that I was previously at. I now have 2wd low-range (not double-low), which I use far more often that I expected. It is not appreciably louder than the rear T-case, either.
The extra gear reduction has shown me other areas that I have to address and strengthen in the truck. A rear anti-wrap bar is now an absolute necessity; the soft rear spring packs cannot even come close to keeping axle wrap to an acceptable range. Stock motor mounts and transmission mounts have also proven inadequate.
Judging on the torque multiplication of the stroker 4.5L engine through this drivetrain, it’s a good thing I chose to put in the stronger NP241 output shaft right away; I’m confident I would have broken some Jeep NP231 output shafts by now.
The total cost of this project was considerably less than what is for sale; well under 4 digits, Canadian funds. Even though there are a few gremlins left to solve (as mentioned earlier), I definitely consider this project a success! And best of all, it is “home-made”!
As with any project, there are many individuals who each played an important role in the completion of this project. Many thanks to Wayne “Fozzy” Foster, Andy James, Robert “Slim” Marriot, Gordon Prichard, Richard “Tiny” Reimer, and Paul Weitlauf.

